On this job we needed to replace a 4X10 header with one that was 3 inches longer. The framers had nailed a strap above the window on the outside of the house for engineering reasons, so it was not going to be easy to get the old header out. The house had already been sided so we could not access the straps and pull the nails out without tearing off the siding too. We decided to leave the old header in place and put the new one in front of it. These are standard 2X6 walls so there wasn’t enough room to fit both headers without making one of them smaller. Since the new one was going to be the structural one, we had to make the old one smaller.
Materials list:
New header beam
New king studs
Lumber for any other framing changes
Tools you will need:
Sawzall
Skilsaw or Circular Saw
Chisel, flatbar, crowbar, etc.
Hammer, sledge hammer
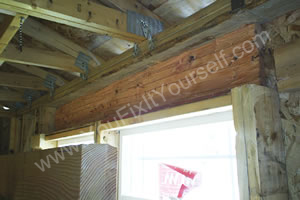
First we used a sawzall to cut the kingstuds flush with the bottom of the header because we would need the new header to go over the top of them. (The ‘kingstud’ is the full height stud at either end of the beam that is nailed to the ends of the beam) Then we took a Skilsaw and set the blade depth as deep as it would go. We made multiple cuts running the length of the beam to weaken the part we needed to remove. The beam was 3-1/2” deep and the Skilsaw only cuts a depth of 2-1/4” leaving about 1-1/4” of the beam uncut. Then we drove chisels and crowbars in the cut lines and pried to break the face of the beam out. We also used hammer claws and framing axes to chunk pieces out. What’s left of the beam would be completely enclosed so it didn’t have to be pretty.
When we were sure that we had the old beam completely out of the way of the new beam, we cut the new beam to length and installed it to the inside of the wall. We used a sledge hammer and started at one end and worked our way to the other end tapping the beam into place. We had windows already installed so we didn’t want to beat on it too hard and risk damaging the windows. We have also found that if you hit too hard when installing a beam like this that it actually goes in slower. When the sledge hammer impacts on the beam, it bends everything around the point of impact and the framing above and below the impact pinch down on the beam preventing it from moving.
With the new beam in place we installed new kingstuds at both ends of the beam to complete the construction project. The old beam is completely enclosed by the new framing and nobody can see that it is still there. And because we left it in place the whole time, we didn’t need to brace up the roof during demolition of the old framing and installation of the new beam. We also installed the new beam without disturbing the siding, windows, or the engineering straps on the outside of the wall.
You can use this method on home remodel jobs where you want to replace an existing window with a larger one. You can leave the outside untouched until the new framing is done, and then cut the new window hole with a sawzall when you are ready to install the new window.